Fermented L-Glutamine

Happy hump day everyone! Just a few more days and it'll be the weekend again. How's that for good news!

As a healthy living blogger I love to share tips and nutrition that I follow myself, as well as the things I benefit from that help me to live a healthy lifestyle. I can't thank you all enough for following along and listening. So today I'm popping in to tell you about my new favourite supplement. Yep, you guessed it, L-Glutamine - a non-essential amino acid. It's found in most protein rich foods and good quality protein powders.

I first came to learn about it + test it out a few of months ago when I started working with North Coast Naturals and it has since become one of my favourite products.

Fermented L-GlutamineSo what exactly is L-Glutamine and why would I want to take it?

Great question! If you lift weights or are a very active person then you probably know all about sore muscles and recovering for your next workout. Well that's exactly why I use l-glutamine. To put it in simply, it's a supplement that can improve your recovery times between workouts. Especially if you're doing hard weight lifting workouts or HIIT cardio sessions that are incredibly demanding on the body. 

Remember I called it a non-essential amino acid? Well that's because glutamine is found naturally abundant in the body. However, our bodies catabolize (destroy) our healthy tissue to get more glutamine for repair. Everytime you hit the gym or workout intensely, those glutamine levels in your muscles are depleted. And we all know that it takes us time to recover. That's why taking l-glutamine can help minimize the breakdown + loss of muscle, improve protein metabolism, and replenish those depleted stores to help the body start repairing muscle tissue right away.  

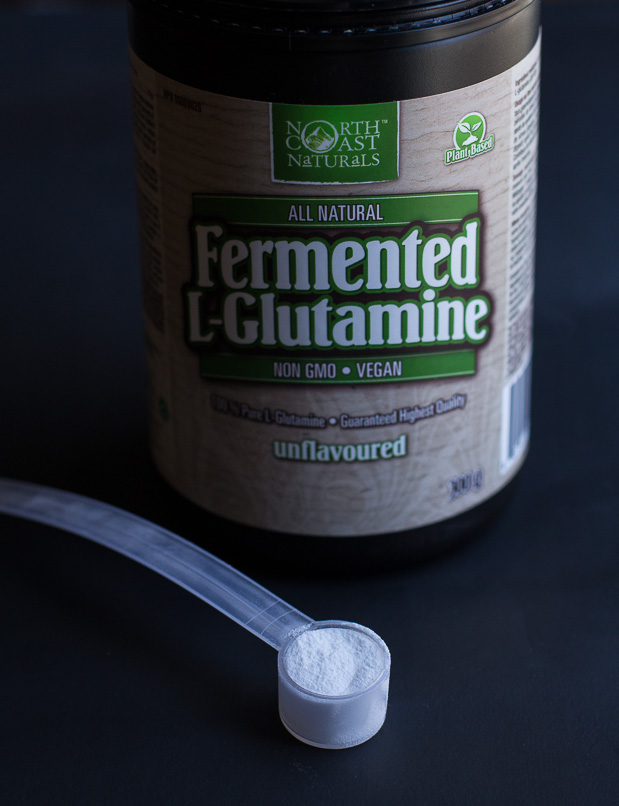
As you can see in the photo above fermented l-glutamine is a clear white powder...no jokes...rolls eyes...It's tasteless and odourless when mixed with water or added to a protein shake or smoothie.I really love North Coast Naturals Fermented L-Glutamine because it's 100% vegan and gluten free. It's sourced from beets that are fermented with probiotic cultures. The cheaper variety of glutamine powders tend to be made from wheat or shellfish and is harder to digest. It's 100% pure from natural sources, non-GMO, and has no added sugar or fillers.

It actually has a lot of other benefits, according to research l-glutamine has been found to help heal leaky gut. It's fundamental to the health of our digestive and immune systems. 

Here's a few more things that Glutamine does and may help treat:

  • Increase resistance to colds and flu - Glutamine is a primary immune booster.
  • Vastly improves recovery times from injury, and surgery.
  • Insures proper acid balance in your body.
  • Helps maintain muscle mass.
  • May help in the treatment of candida yeast overgrowth and irritable bowel syndrome.
  • Participates in glycogen synthesis.
  • Helps maintain cell volume and hydration.

How and when to take it: 

I have been taking it either just after my workout or before I go to bed, when your body is recuperating and your muscles want to repair themselves. To take it you mix one scoop (2-5 grams, or 1/2 to 1 teaspoon) into 1 cup of water or add it to your post-workout smoothie. I only take it once a day because I find it's all I need, but I've read that it's okay to take it 2-3 times daily.

Has anyone else out there ventured to try fermented l-glutamine?

Have a great day!

5 Budget Friendly Props To Improve Your Food Photography

Today's post is for the all food photographers and bloggers. I get so many wonderful comments on my photos that I thought it would be fun to share some helpful behind the scenes tips, which I use all the time. I've been focusing on improving my skills lately and really working at finding the best work flow that works well for me. 

Lately I've been trying out some budget friendly things in my photography. Little household items that have helped me improve my photos and really make my life easier. Naturally I thought, "what a great idea to share some of these little tricks." So let's jump right into it!

#1. White Bed Sheet or Curtains

Simply put this is just a great big diffuser. Don't laugh. This is a great tip to filter and soften the lighting from your window. If it is an especially sunny day out, double up the bed sheet to make it thicker for extra diffusion. Who needs to spend a ton of money on a fancy diffuser when you can just DIY? For many of the pictures I take, I cover the window of my main light source with a large white cotton bed sheet draped (or clipped with clothes pins) over the curtain rod. If you already have sheer curtains hanging then you're all set to go. 

You'll notice in the second photo taken without the bed sheet that the light falling on the lemons looks a bit harsher, which is a bit distracting.


#2. Crumpled Tissue Paper

Take 2 or 3 sheets of tissue paper and give it a bit of a scrunch up in your hands. This makes a perfect background. There is something very rustic looking about it that makes you want to dive in and eat. It's cheap, it's easy, and you most likely have some laying around the house somewhere from the last time you wrapped a gift. The best part is you can choose colours that will compliment the colour palette of your subject. You could go neutral or eye popping. I did this with the Chili Lime Roasted Chickpeas that I made back in the summer. 


#3. White Foam Board

First of all, please ignore the junk sitting in the background ;). One of the most useful inexpensive thing you can get is a large piece of white foam board. It makes the perfect light reflector that let's you fill in areas of your shot that are dark. Natural light is best. It's easy to control and can create some beautiful shots. I usually position my table adjacent to a window as I want the light to all come from one side, creating nice shadows on the opposite side of the photo. If the image looks too dark and the shadows need softening, I'll prop this guy up right beside the other side of the dish I'm photographing. The white board bounces the light coming in through my window back onto the food. The closer you place the white board to the subject the brighter your image will be. You can pick these up at almost any craft store (even Walmart) for a few dollars. Score!


#4. Linen Fabrics/ Pillow Cases

Linen is quickly becoming one of my favourite kinds of backgrounds to use. It has a beautiful soft woven texture that stands out really well in photos and helps to tell a story. Here's a recent post I made for a brussels sprout side dish where I used my favourite light brown/ beige coloured linen napkins. Don't have any linen napkins? Old pillow cases will work just as great, and don't forget the fabric store. You can pick out whatever kind of colour or pattern you like and buy a yard or two while staying within your budget.


#5. Spritz Bottles

Big or little it doesn't matter. A spritz bottle filled with water can become your best friend when it comes to food photography.  Just a few spritzes of water can bring food to life. It can give fruits and veggies that fresh picked look and make your photos look tantalizingly good.

Thanks for reading along with me today! I'll be back with some food goodies next week.

Cheers!

Jennifer